
The Interview: |
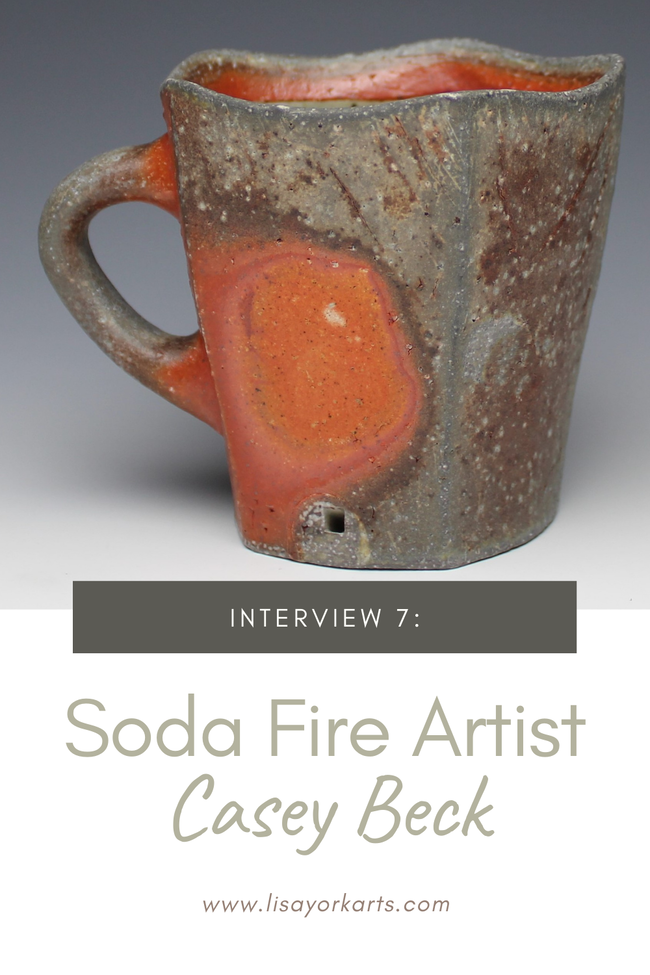
 | About Jenna: "I am an artist and maker from Frederick, MD. My time in clay is split between sculptural and functional work inspired by patterns, textures, and forms found in an around the ocean." |
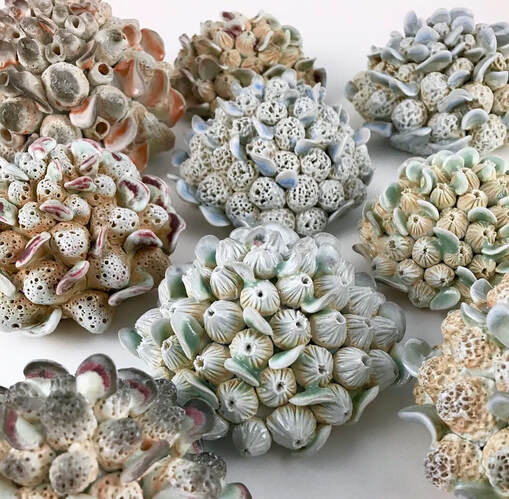
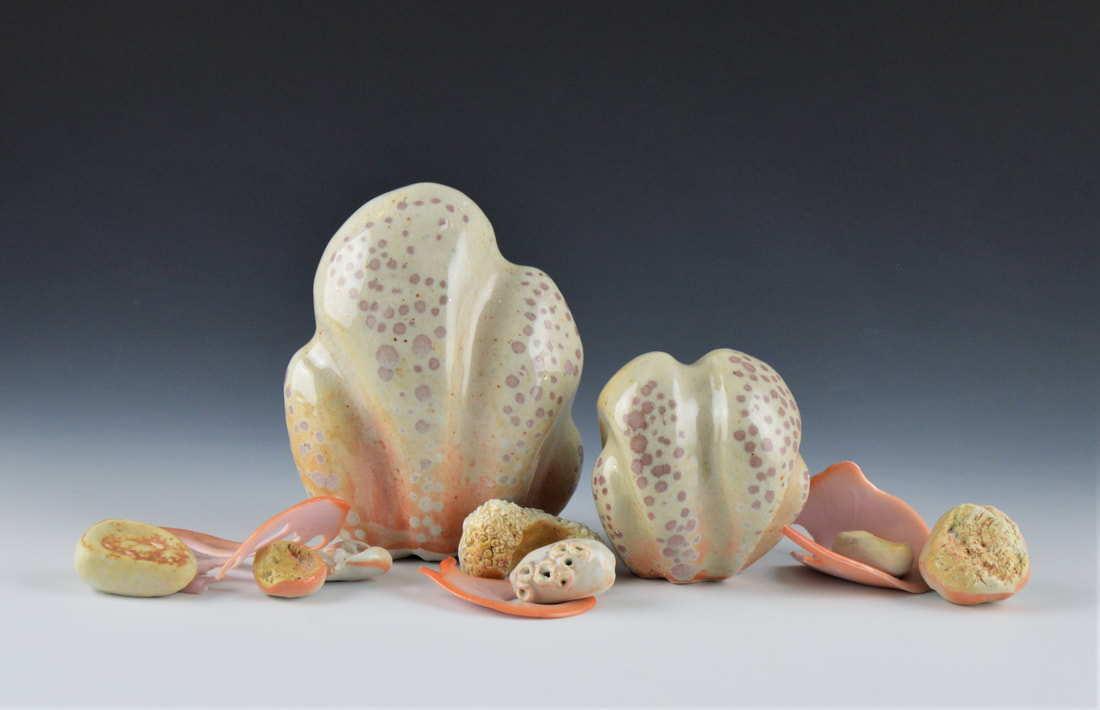
"My soda fired sculptures are a study in the growth processes and environmental effects that add patterns, shapes, and textures to natural objects. Found specimens such as sea shells and coral pieces serve as a catalysts for form and surface explorations that celebrate the inspiring intricacies of nature."
"Although the addition of soda can add to the textural qualities of my sculptures, and I do utilize added soda for some firings, I found that through the residual soda firings, I was able to achieve the perfect color pallet to resemble the colors found in the shell and coral pieces that I was attempting to capture. Beautiful oranges and bright pinks, the subtle hint of soda left trapped in the kiln walls, was all that was needed to bring out these colors on the porcelain clay body."
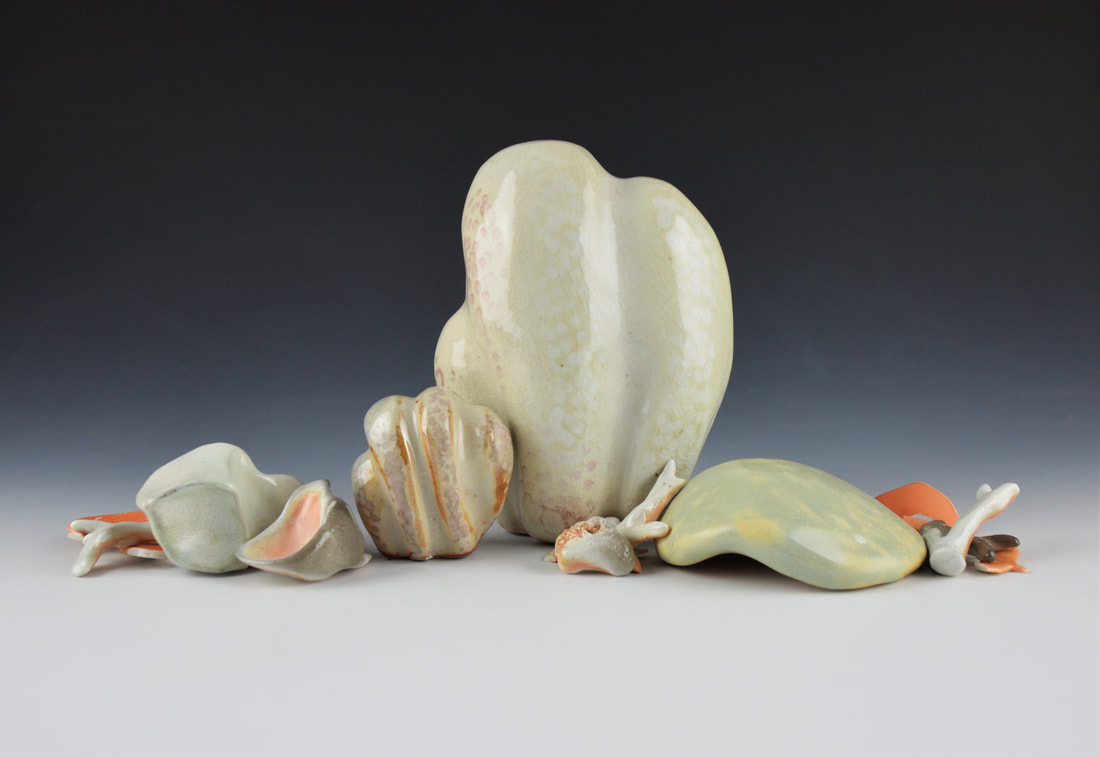
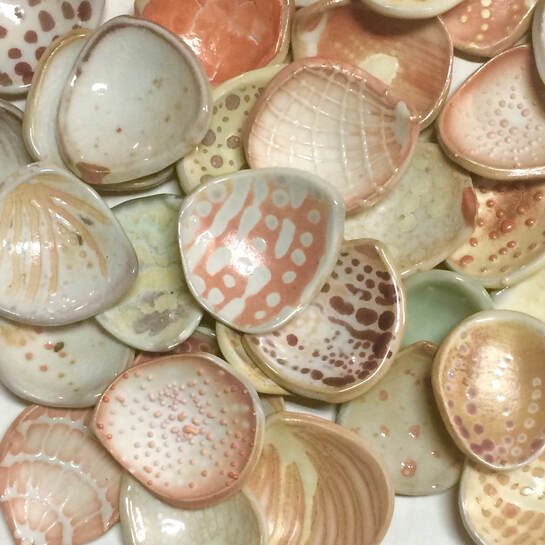
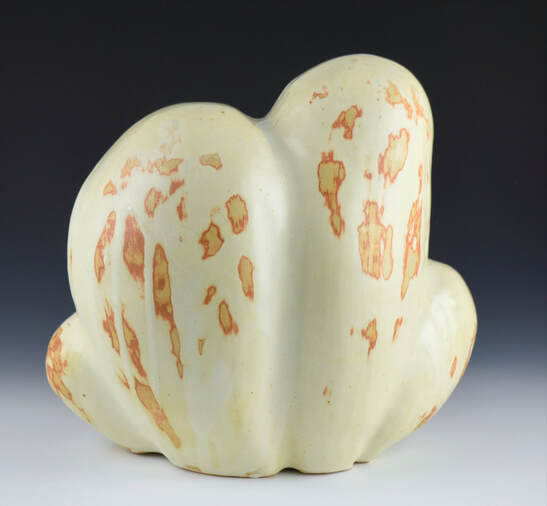
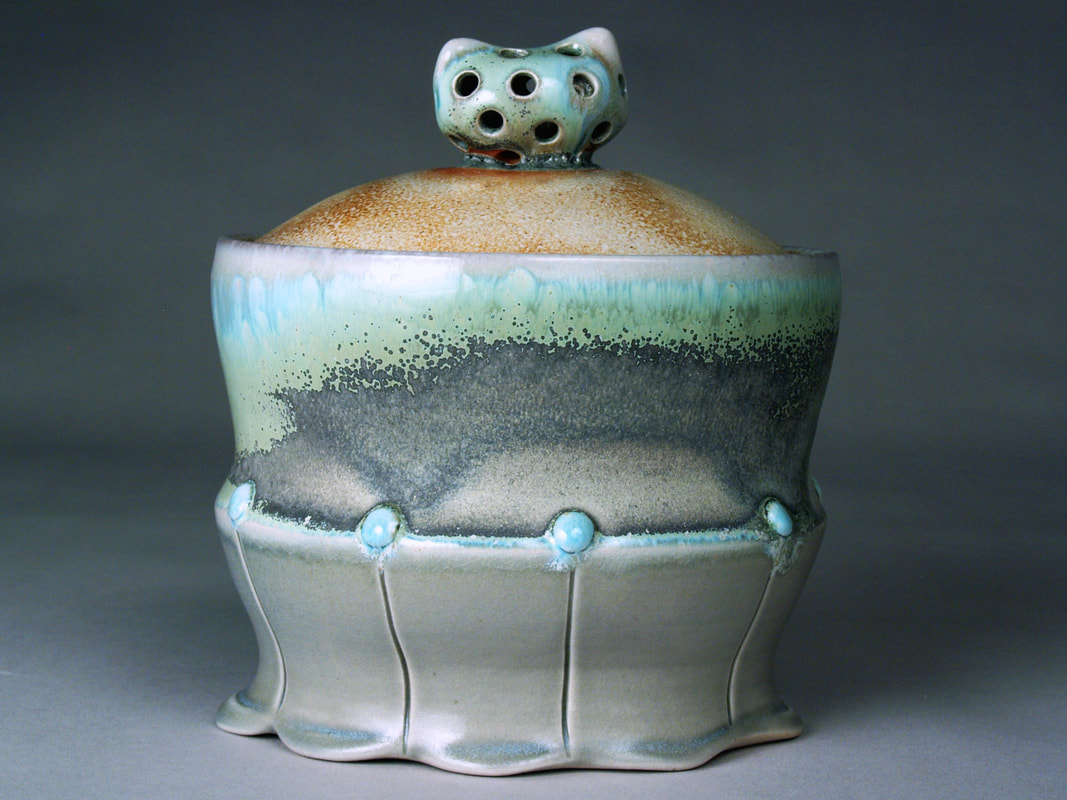
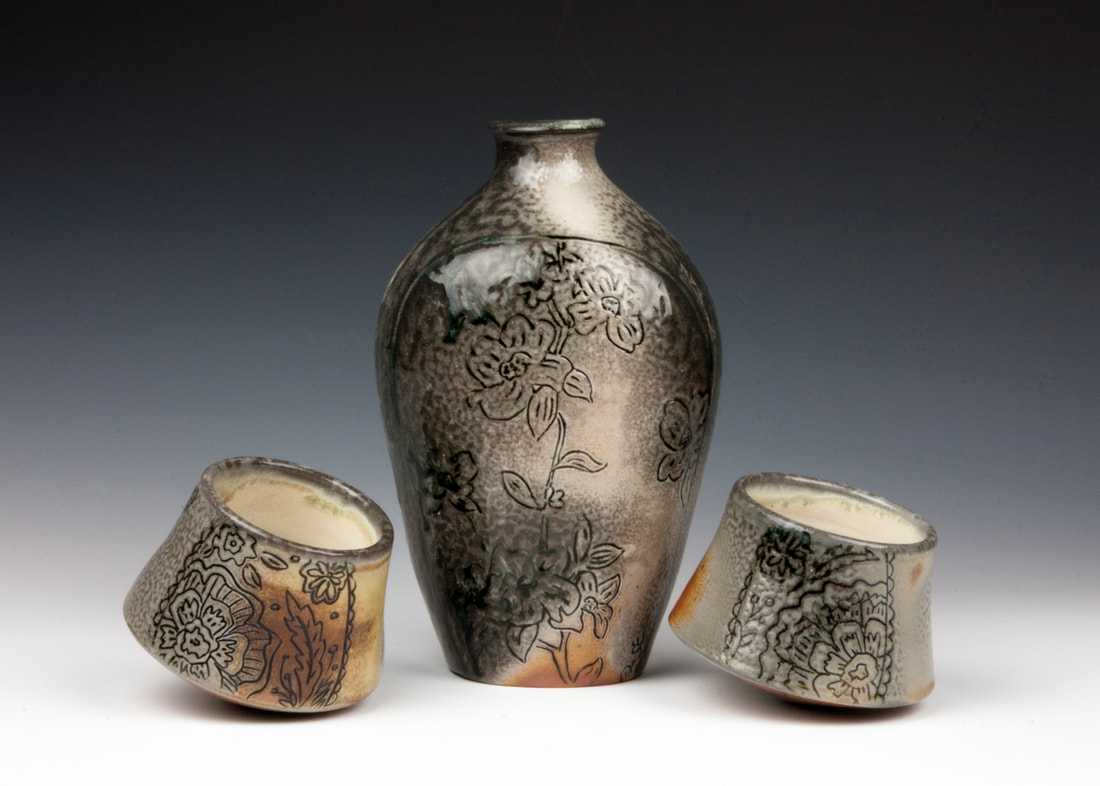
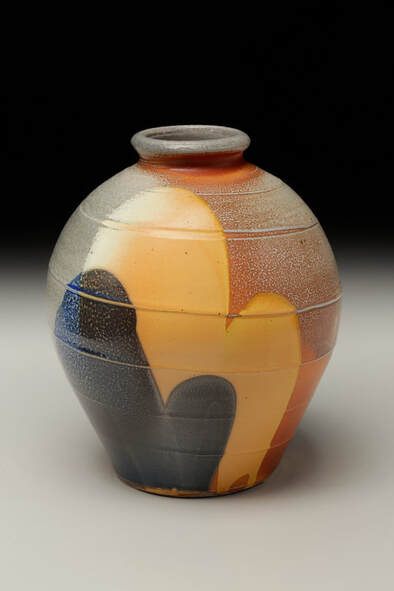
"I mostly use Standard 257 clay body. It’s a porcelain clay body that really captures the flashing in the residual firings in such a beautiful way. I tested many other bodies, but this one is my go-to. It also throws really well, so I can use it to create functional work that I use to help fill the kiln! In the image below, the base of this nest piece is made from the 257 porcelain, no glaze was added, and it was fired in residual soda, creating a beautifully flashed color all over. Another material I use is commercial casting slip. In the residual soda firings this clay body produces a fantastic orange flashed and opalescent surface. The casting slip is drizzled on a plaster surface, kind of like making a funnel cake! The pieces are then scraped off when stiff and create these fun little accents that I use throughout my sculptures. You can see these pieces in the piece below (the bright orange pieces)."
"Although I totally love the subtle effects of the soda on the bare clay surface, I am a sucker for glaze and have done a lot of testing on the effects of glaze in the soda kiln. Having fired a gas reduction kiln in my early experiences in grad school I narrowed in on a few glazes that I really loved on my functional pottery, a shino, a celadon glaze, and a copper red. When I switched to soda I decided to try these same glazes in the soda kiln, heavily glazed, just as I would in the gas kiln. I wanted to see what they could do, so I played with application and layering, breaking some rules. What if shino wasn’t first? How would copper red look over the celadon glaze? What if I sponged on glazes. I found some really fun and exciting results this way that were giving me the colors and textures that I was looking for especially in the surfaces inspired by the different collected shells."
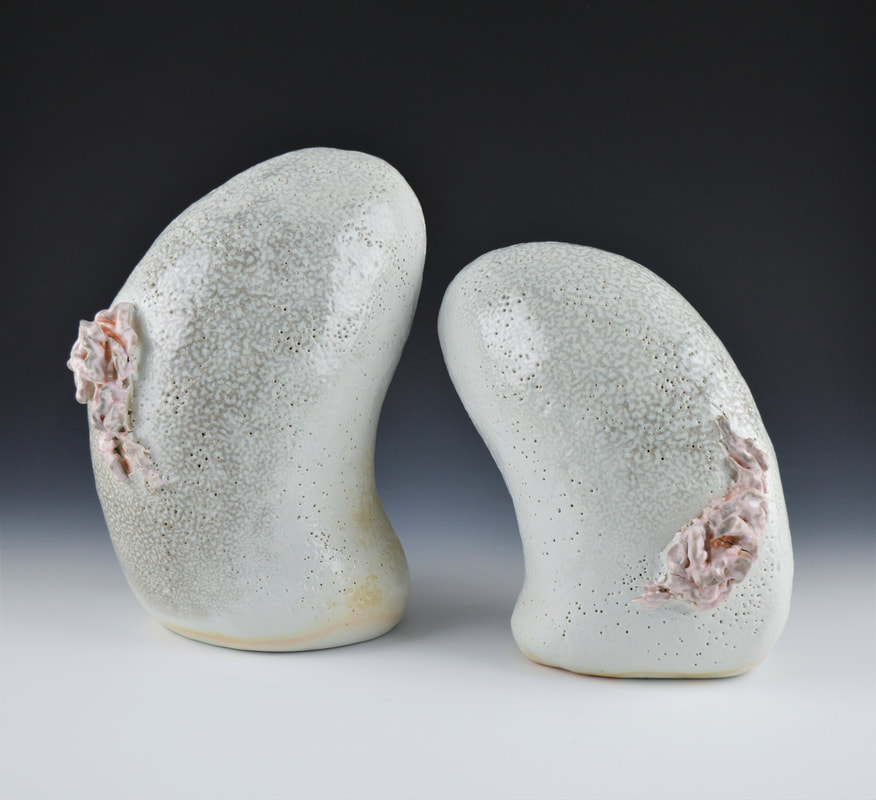
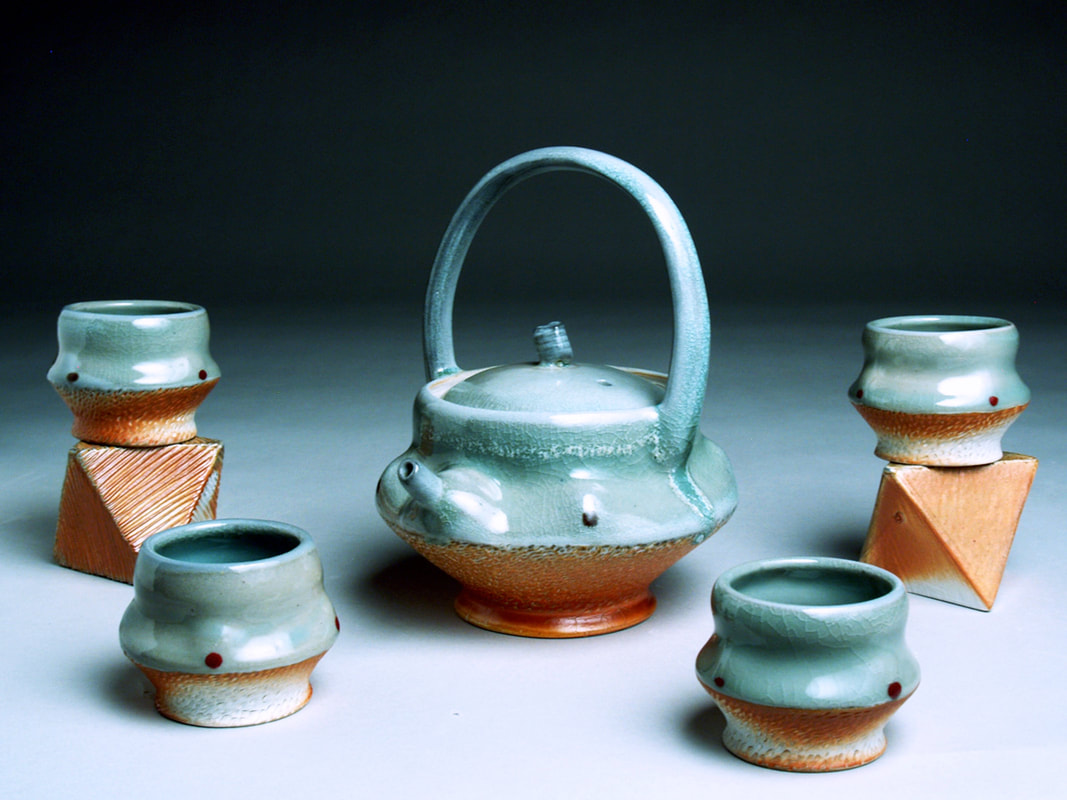
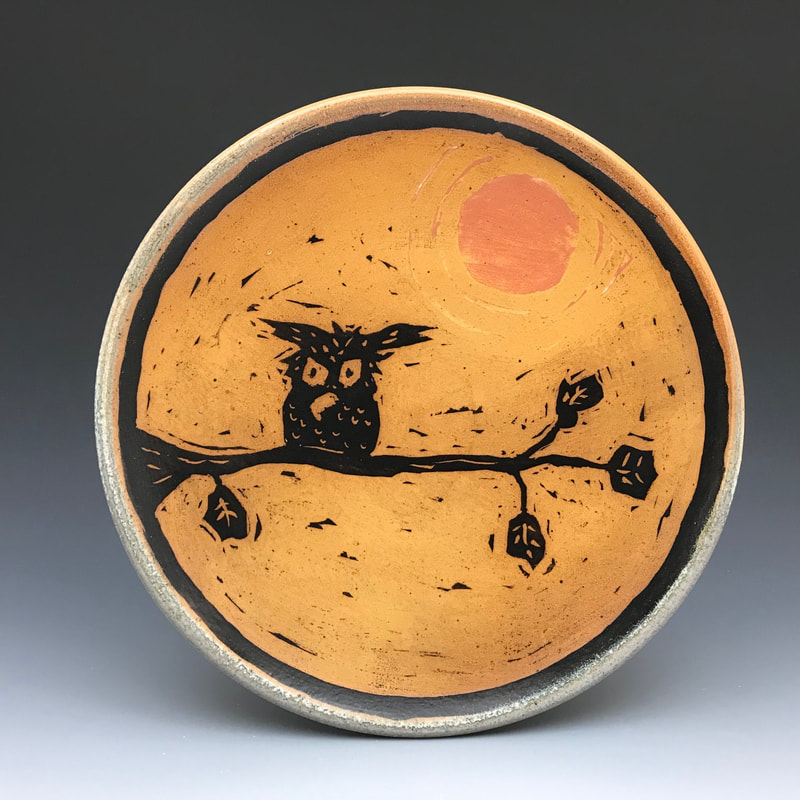
"I have a glossary of sorts of glazes/application methods that give me the results I’m looking for on a particular piece. The basic glazes I use are a shino, a copper red glaze, and a yellow salt glaze. Then I utilize a certain application technique which can produce some really unique results. For example a copper red glaze, slip trailed over a shino, or the yellow salt glaze sponged on, the shino glaze dipped then wiped away. The ability to layer and apply in different ways gave me a lot of flexibility without having to use 10 different glazes. The image below shows the yellow salt glazed poured on and then wiped away in certain areas, then thin application results in a bit of a rough texture as well as an orangey color that also reveals some of the flashed clay body."
"I find it’s best to have at least one or two regular soda firings in between the residual firings to allow for the depositing of new soda material inside the kiln."
Are you adding wood into your propane soda firings?
"I do add wood, but it’s a pretty light application outside of the reduction portion of the firing. When the kiln is reaching about cone 012, I begin adding some small pieces of wood to bridge into a reducing atmosphere, I ramp up the wood addition to 1 pieces every 10 minutes or so through body reduction and then I add as needed/wanted for the remainder of the firing."
"I will start with a firing schedule that is pretty closely modeled after my experience firing a gas reduction kiln. A medium to heavy reduction period from 012 – 06 using wood and damper movement to change the levels of the atmosphere. Then I take a slow rise to cone 10! Although I’m not adding soda, I still wad all work as there is a slight depositing of soda from the walls, shelves etc."
Are you using more than one firing atmosphere (heavy soda, wood, electric) to fire your sculptures?
"My firing schedules/atmospheres are now fairly consistent. Rather than changing the firing to get the surfaces I want, I tend to change up the glaze layering and application techniques to produce the desired results, this way I can fire all the work in one firing rather than having several different firing types to produce the individual finishes."
"Sure! All are ones that were shared with me or just the studio glazes at the studio I worked in. It was important for me to find glazes that were stable and readily available, so that I didn’t have to purchase special materials or have the expense of making glazes that I couldn’t use for anything but the sculptures. Some of these decisions were more economical than artistic, but the results worked!"
| Dresang Shino (Cone 10) Weight % Minspar 34.3 Australian Spodumene 29.4 Nepheline Syenite 14.7 EPK 9.8 Soda Ash 7.8 OM4 16.4 Pete’s (Pinnell) Cranberry Red (Cone 10) Weight % Custer Feldspar 73.8 Gerstley Borate 10.2 Whiting 11.1 Flint 4.9 Copper Carbonate 0.3 Tin Oxide 1 | Yellow Salt (Cone 10) Weight % Nepheline Syenite 63.9 Dolomite 21.1 Zircopax 16 OM4 4.3 Bentonite 4 Red Iron Oxide 1.12 |
Be sure to join my Soda Fire Educational Series to keep learning more about soda firing.
The Interview
  | What attracted you to soda firing? "Initially I fell in love with soda firing because I hated glazing. It was so seductive to only glaze the inside of my work and let the process finish the outside. Points of interest emerged from the variation caused by the interaction of the soda with the flame, creating warm hues and subtle orange peel textures. Even my bad beginner work looked polished if the soda kissed it just right. My obsession with soda firing solidified because of the community aspect. I loved being a part of a small group firing with the little soda kiln we had at my university (UNCW in North Carolina). We didn’t have any electric kilns there. All the work was bisqued and cone 10 reduction fired in large gas kilns. The soda kiln offered a different effect and students were allowed to fire it without the professors once we learned how. I enjoyed having more control over the process and my finished work. Those late night firings with my classmates are some of my best studio college memories." |
"I went to grad school at University of Florida. We had two soda kilns there that had challenges. I spent the first year trying to fire the large one with poor results. There wasn’t a community of people interested in atmospheric firing, most electric fired. I had trouble filling the kiln by myself to meet my critique deadlines. Additionally the large kiln was in poor repair and needed rebuilding. The small soda kiln shared a chimney with the large soda kiln. This was a bad design and both struggled with getting to temperature. After a number of firings that didn’t get to temperature with 20 hours of firing (what should have been 8 hours with a proper overnight candle), I convinced the department to give me funding and credit to rebuild the large soda kiln with the teaching lab tech.
Building the new soda kiln was a fantastic experience. I had built parts of kilns before but never one from start to finish with just two people. So as you can imagine it took longer than expected. In the meantime I had to keep making work. For a time I switched to cone 10 reduction in our Geil kiln. Then I did an independent study with Linda Arbuckle focused on pattern and color. As I became more interested in creating dynamic surface on my clay work, reduction gas firing made less sense. I also began to question what kind of a studio/kiln situation I would have after grad school. I am a city kid, I like living in metropolitan areas and my ultimate goal was a home studio. I made the difficult decision to change my clay, glazes and forming processes to create a body of work that made sense for cone 6-7 electric firing. Electric firing is not only more sustainable but its more economical and something that can exist in a densely populated area. Just as I was beginning to figure out my new materials we finished building the soda kiln. I had gotten so far from the soda-fired aesthetic it just didn’t make any sense to go back.
I do enjoy participating in a soda firing when I get the chance but for now electric firing is the best fit for my work and my lifestyle."

"I miss the active firing process and how it can insight a sense of community with others: I always enjoyed the camaraderie that came from working towards a common goal. The varied firing results made each kiln-opening feel like Christmas morning. That anxiety and anticipation while waiting for the kiln to cool was an intoxicating feeling. Would all the work pay off? In the same vein, I do not miss the high loss rate of soda firing or the heat exhaustion I felt after spraying soda into the kiln. Towards the end of my time working with soda, my brain always felt so fuzzy the day after firing. The health hazards of soda firing are real and even though I always wore the proper protective gear (respirator, face shield, long sleeves and pants made from cotton) I don’t miss exposing myself to those vapors. It also feels so good to know that the enormous amount of time I spent loading, firing and bricking up the door can be utilized in other ways."
"Honestly, I don’t think I do reference soda firing in my current work. My surfaces are tight, colorful and controlled. I don’t incorporate texture or carving anymore. Solid blocks of underglaze and a custom glaze palette create graphic geometric motifs on my electric-fired work. Instead of letting the firing process finish my work, I make intentional decisions when I am forming the work as to how I will decorate and glaze it. I’d say my work now is more a reaction from than a reference to my older soda work. My soda-fired work never had a voice that was uniquely mine; it was all derivative of other people’s work that I was influenced by at the time. Freeing myself from that type of firing and process helped me find my style."
(Click Links below to see the resources)
More About Adrienne Eliades:
She is a studio potter and educator living in Vancouver, Washington. She earned a B.A. in Studio Art from the University of North Carolina at Wilmington in 2008 and an MFA from University of Florida in 2016. Adrienne has been artist-in-residence at Ash Street Project in Portland, Oregon, Guldagergaard International Ceramic Research Center in Denmark and the Bright Angle in Asheville, NC. Her works and writing are featured in numerous publications including UPPERCASE Magazine, Craft in America, Ceramics Monthly and Pottery Making Illustrated. Ceramics Monthly named her an Emerging Artist in 2018. In addition to maintaining a vibrant studio practice, Adrienne teaches at Portland Community College, is the Studio Coordinator for Idyllwild Arts HOT CLAY Summer Program in Idyllwild, California and has presented over 20 workshops nationwide.
Find Adrienne on Instagram @bugaboo_eyes
And learn more about her on her website: www.adrienneeliades.com
The Interview:
Soda Firing topic: Mishima
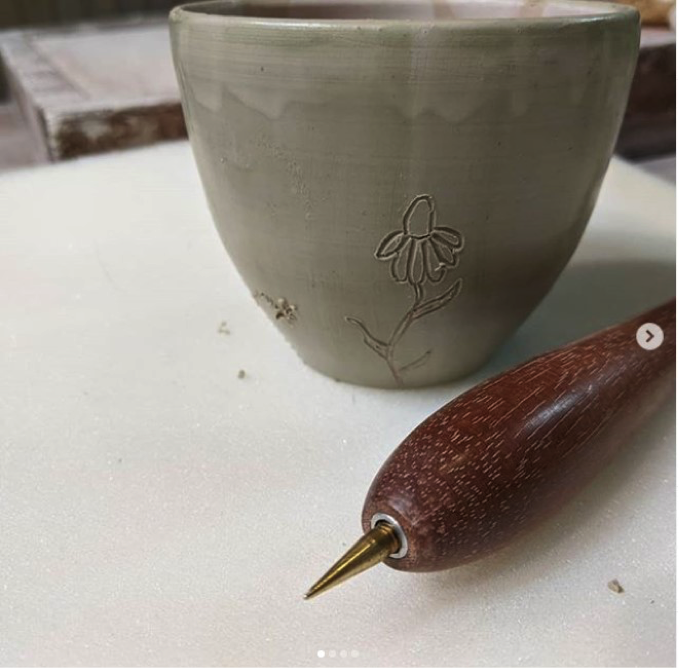
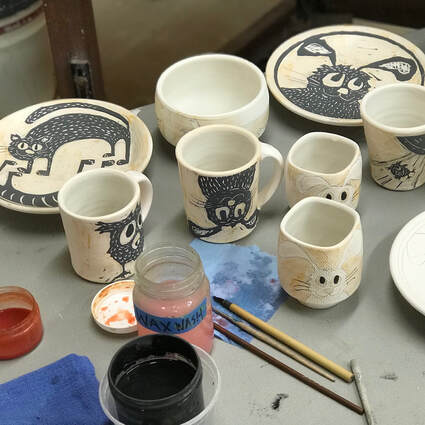
 Denise Joyal & her work 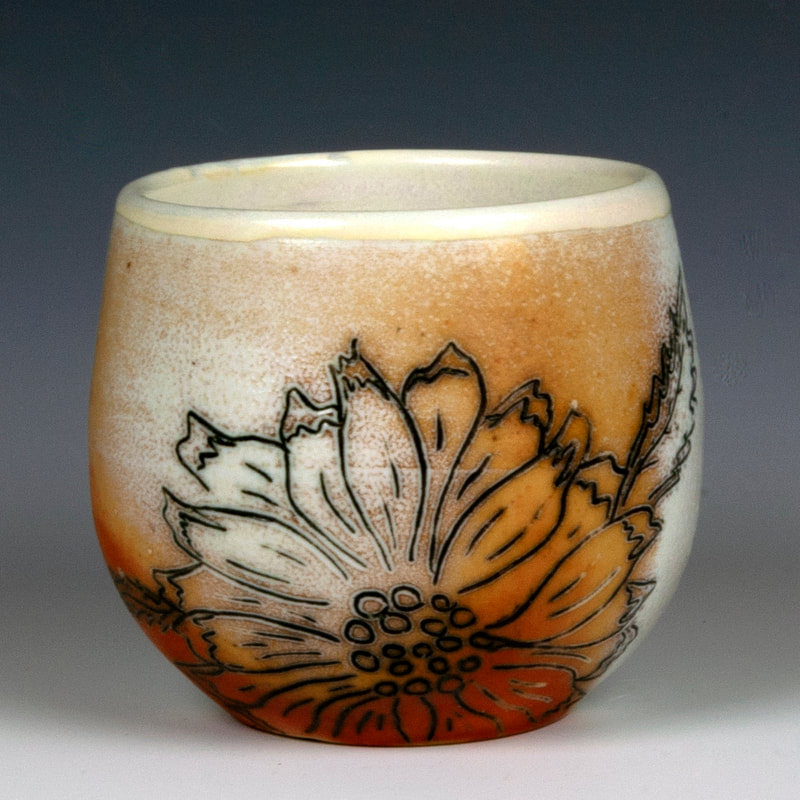 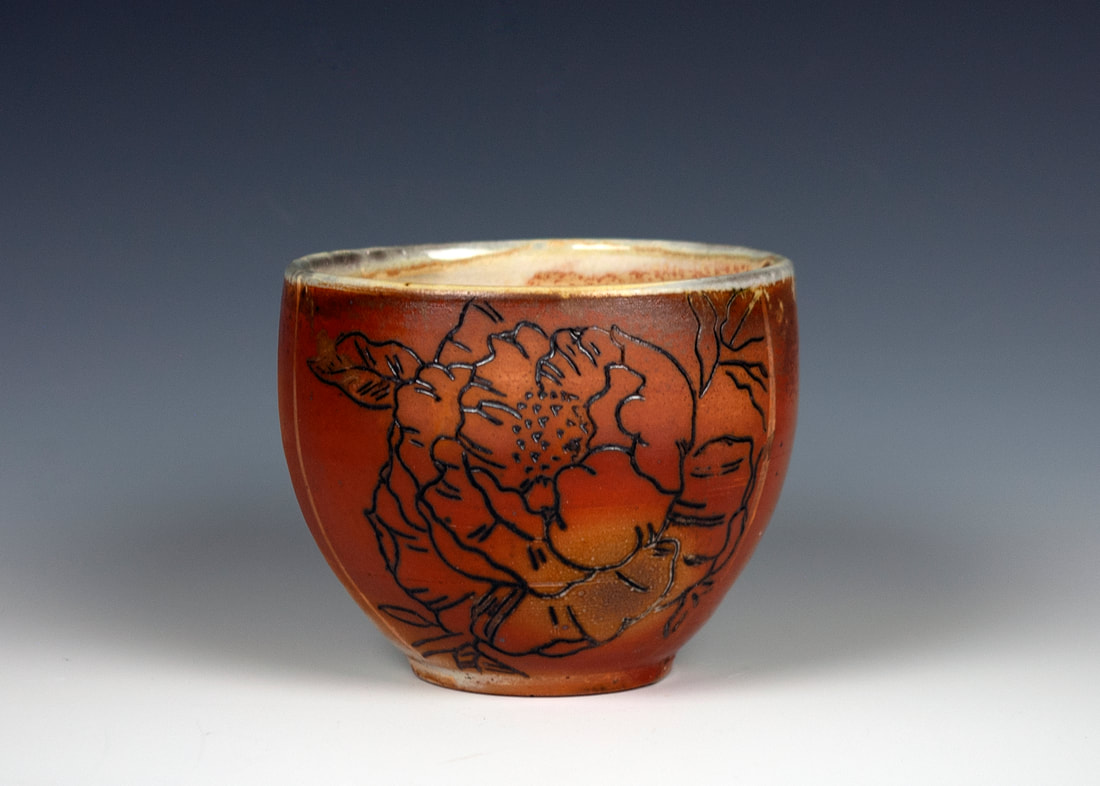 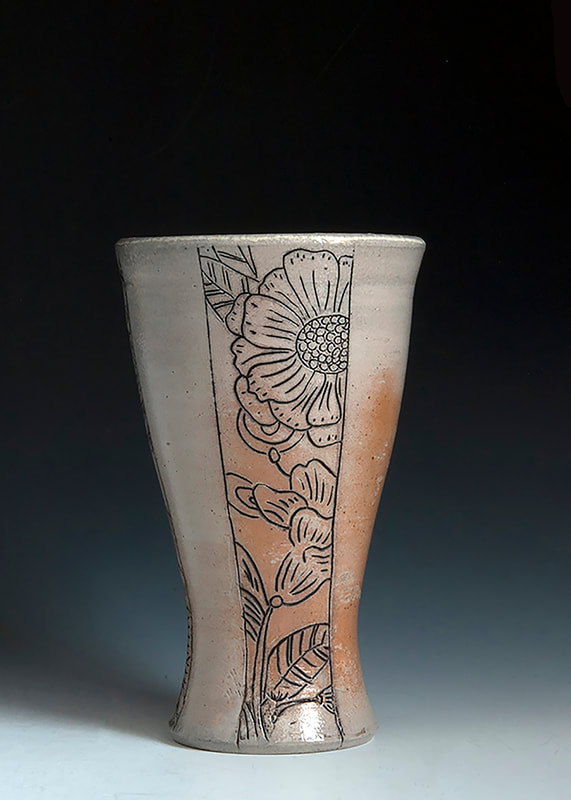 | About Denise: Soda and wood-firing potter, and adjunct professor, making primarily functional ware. What inspires the imagery for your Mishima carving? "I have a number of sources of inspiration. I love to garden, so I use a lot of floral imagery. I am fascinated by textile design and graphic design as well, and often find myself using patterns I see in fabric or a random online design as a starting point for a design to carve." At what stage do you do the Mishima carving? "I do my carving at leather-hard. I feel like there are a few stages of leather hard, so I would say it’s more of a hard leather hard (parmesan cheese, not cheddar)." What tools do you use to do the carving? "Initially, I tried using an Exacto blade. Kudos to those who have success with this tool. I couldn’t manage to get the curves I wanted using it. After trying numerous already existing tools, and not getting the line quality I wanted, I researched a number of metal tips in multiple industries for all types of purposes. I settled on one I really liked. I was excited that the tip was threaded and could be replaced without replacing the whole tool. I then asked my friend, master tool-maker Troy Bungart, if he would collaborate on a custom tool for me. After sending back and forth a few revisions, we came up with one I really like. I will be selling them at The Roomshow at NCECA in Richmond. You can also contact me to order one directly." Why do you like Mishima in soda firing? "My designs, and my work, tend to be fairly controlled. I like using Mishima in soda, because it partially bleeds the inlaid underglaze onto the surface of the work in unexpected ways. Sometimes, it will leave an outline around my carved imagery. I think the atmosphere helps loosen my otherwise tightly controlled work." What are the advantages of Mishima in light or heavy soda application, and which do you prefer? "I like both for different reasons. Light soda preserves more of my designs while still offering some softness to the line, which can be really striking. If I spend a lot of time on an overall design, it may be preferable. Heavy soda may even obscure parts of my design. That said, I love the contrast of heavy directionally applied soda. I can stack my work to ensure that the parts of the work I want to receive the most soda do when firing this way. This allows me to get the best of both worlds, by having a heavy juicy gray soda side and a lighter, orange flashed side. My goal in these effects is to mimic the way sunlight, just before sunset, creates long heavy gray shadows while illuminating surfaces still in its path." |

 | Thanks Dense for sharing about your mishima surfaces in the soda kiln! Find more information about Denise at: www.kilnjoy.com Instagram: @kilnjoy, @theroomshow |
Take me to the Archive of Soda Fire Blogs
Bonus!
| Denise's Flashing Slips
| Denise's Clay Bodies
|
The Interview:
 | About Ron: "I’ve been making pots full time in Shelby, NC since 1997. I took my first pottery lesson at a night class in 1992. I studied mathematics in college but wanted to go to art school. I had hoped to become a sculptor or painter and live in a big city. Instead, I became a potter, making cups and bowls; living a nice, quite life in the country. When I’m not working in the pottery studio I enjoy reading, drawing, journaling, drinking tea, playing drums, and practicing yoga." |
 | When did you start Soda firing? "I started using soda in 2013 when I built a new kiln. I had been a salt glazer from 1997-2008. In 2008 I started working in earthenware fired in an electric kiln and I took a 5 year break from salt glazing. When I decided to go back in 2013 I took down my salt kiln. The fireboxes were in bad shape and it was time for a rebuild. After the new kiln was finished I decided I’d use only soda and no salt. I also decided to work with a lighter clay body. With my salt glaze work I had used a course stoneware. After testing a few different clay bodies I settled on Laguna B-Mix with grog for the soda fired pots." |
Why did you switch from low-fire graphic work to soda-fired ceramics?
"After making the low fire work for several years I began missing the salt glaze surface. I love the variety of surface and somewhat unpredictable results from sodium glazed pots. The earthenware taught me a lot. I had fun coming up with the animals and other motifs I used on the low fire pots. I also enjoyed working with color here and there. I had four different bodies of work in the earthenware over the whole time I was making low fire. The decoration was labor intensive. When making stoneware I had been used to the pot being practically finished when it came off the wheel. For the earthenware I’d make a batch of pots and then have to sit and decorate them all. I liked that the batch size was much smaller. I could fill my electric kiln very quickly and then just push a button to fire. With the propane kiln I had to make at least 150 pots and it took 16-20 hrs to fire.
Low fire glazes were a challenge as well. I wanted a clear glaze and an amber glaze that had the depth and beauty of pots I had seen from England that were covered in lead glazes. Of course I could not use lead. I had a few glazes I used but I was always a bit unhappy with them."
"It was pretty easy for me to go back to high fire since I had been doing it for so many years before I switched to earthenware. It was great to get back to some clay that I could really throw. My first soda firing went pretty well. I had some nice surfaces and soda glaze coverage. I was not drawing on the pots. I was doing some stamping, rope impressing, faceting, etc. All that looked great in soda, much as it had in salt. I liked the more directional aspect of soda. The pots had lots of variation from one side to the other."
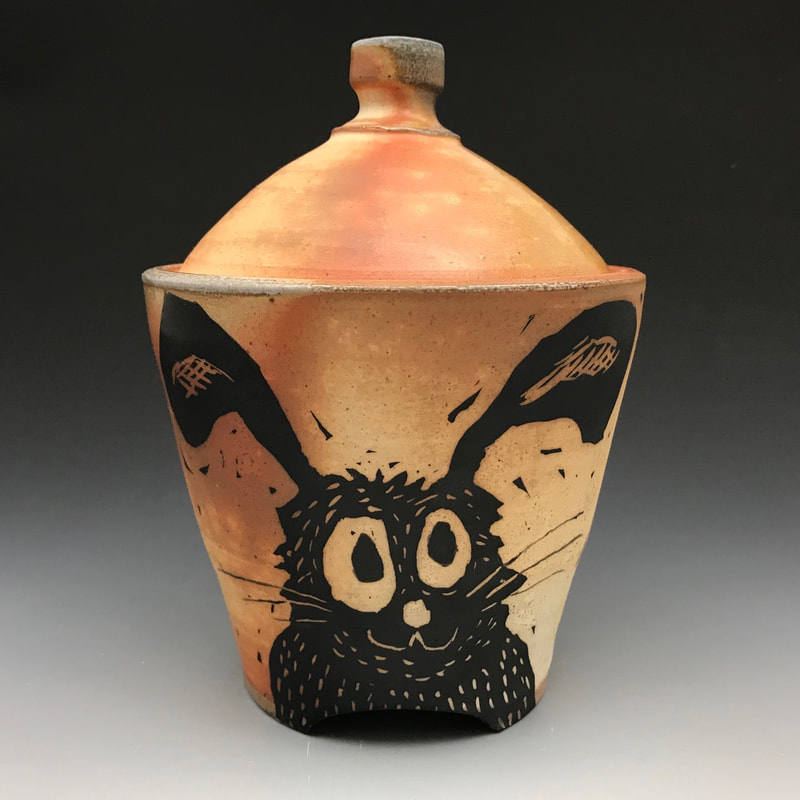
What inspired you to start adding drawings of animals onto your soda fired work?
"I had really loved putting the animals on the earthenware. I had tried several times over the years to decorate the sodium fired pots in a way that worked for me and looked okay. I never felt like I was good with a brush. I probably just gave up too soon. With the earthenware I had used sgraffito and that was great. The contrast of white slip on red clay was so bold. I liked the sharp line and detail I could get. But it was hard on my body, all that scratching away of clay. So I didn’t want to go back to that. Throughout the time making soda glaze I would every now and again try a pot with some imagery on it. Nothing ever appealed to me until I started using the wax resist method. This was a technique I had seen Michael Simon use very early on in my pottery life. I knew a few folks who used wax and I had dabbled in it a bit. In early 2019 I took the plunge and decorated about 20 pots and fired them alongside the other pots in the kiln. That’s how I’m currently decorating, using wax in the negative spaces and brushing on an underglaze slip for the imagery. I am back to very labor-intensive work again! I love the results but I am wishing I had a smaller kiln. I’d like to make 50-60 pots and then fire."
 | Are you firing your soda kiln differently with this newer work? "Before I started decorating I was putting 3 ½ lbs of soda ash in the kiln. That was great for the textured pots and all the surface action I wanted. With the new pots I’ve backed off to 2 lbs. I also am firing a little cooler. Instead of cone 10 flat I’m now firing to cone 9. I’m experimenting with some slips that look nice if they are a bit cooler and drier. It’s funny, I was all into shiny and more soda for a few years, now I’m going the other way." |
"My firings are about 16 hrs long.
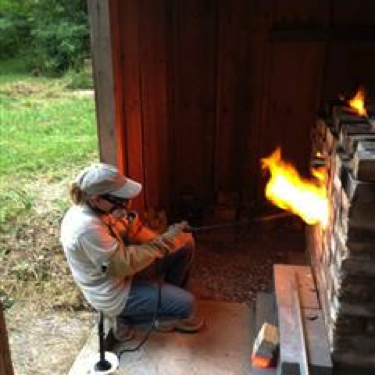
I fire in a medium reduction. I’m looking for flashed surfaces and some soda build up. I don’t want a lot of gray carbon trapping. I mix soda ash in a 1 lb per 1 gallon of hot water ratio. I start spraying at cone 8. I’ll go around the kiln spraying in 5 sec bursts in each of the 14 ports. I also have 10 ports in the door that I will sometimes use. After each cycle of spraying I wait 15 minutes and repeat. I pull draw rings to gauge the amount of soda build up. Spraying takes about 1 ½ hrs.
After I’ve used as much soda as I want I’ll oxidize the kiln for 30 minutes and make sure I’ve reached the cone I’m going for (9 for the decorated work, 10 flat for the undecorated) before shutting off the gas. I then pull some of the soda ports and open the damper to crash cool down to about 2025 deg F. I think this fast cooling promotes brighter slip colors."
"I am enjoying the more decorated work that I’ve been making this year. I will continue to work on that, coming up with new imagery and forms. I would like to have a try at cone 2 soda firing. I have a custom clay body that I like and I think would work well at that temperature. I may also build a smaller kiln."
His Flashing Slip Recipes
 |  |
| Bauer Flashing Slip EPK 42 OM4 Ball Clay 42 Zircopax 10.5 Borax 5.5 | Tile 6 Slip Tile 6 Kaolin 14 Grolleg Kaolin 3 Neph. Sy. 2 Silica 1 |
Check out more of Rons work!
Etsy Shop https://www.etsy.com/shop/RonPhilbeckPottery
Instagram https://www.instagram.com/ronphilbeck/
Facebook https://www.facebook.com/ronphilbeckpottery/
My new trick for cleaning up pots.
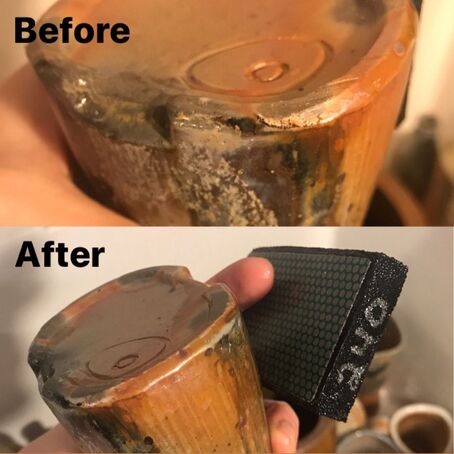
Ps. these ideas usually apply to wood fired pots as well, and disclaimer this was an example of cleaning up a wood fired pot.
Cone 10 Glaze Recipes for Heavy Soda
 Old Yellow Base 64 Nepheline Syenite 21 Dolomite 16 Zircopax 4.5 OM4 Ball Clay 4% Bentonite |  Murky Yellow Base 64 Nepheline Syenite 21 Dolomite 16 Zircopax 4.5 OM4 Ball Clay 4% Bentonite 1% Iron Chromate .3% Cobalt Carbonate. |
Cone 10 Flashing Slip for Soda
Grolleg 70
Neph sy 30
Yellow Iron Oxide .5%
Titanium dioxide .5%
The Interview:
"I live in St. Pete, Florida, where I am an Artist-In-Residence at the Morean Center for Clay."
When did you start Soda firing?
"I started in an intermediate pottery class as an undergrad."
How long have you been faceting your work?
"I started working with that way of forming pots when I was building a portfolio for my undergraduate thesis show."
What are the benefits of putting your faceted work in soda kiln?
"I like to put glazed pots in the soda kiln. My ‘shtick’ about glaze on form is that it’s like a blanket of snow over terrain or river rapids moving over a rock bed. The form beneath the glaze determines the thick-to-thin pools on the surface. Soda is especially good because the glaze reacts and drips more with soda, and stays firmer and more resolute without it- it tells a ranging story as you rotate one pot around."
What is a typical firing schedule/ soda introduction for you?
"It’s a pretty heavy amount of soda at the end and a relatively cavalier firing approach. My firing has 4-5 pounds of soda into a ~30 cu foot. Cross draft, sprung arch kiln. There are two forced air burners.
I candle overnight, then add an inch of pressure each hour once I start firing in the morning. 90 minute stall for body reduction, then let it climb in light reduction to soda. I spray all the soda in one go as cone 10’s are falling. Cut down the air on the blowers, tighten the damper 1-2 inches, and just spray in through two ports that are on either side above the burners."
What other types of firings do you like to do?
"I get in on wood firings whenever I can. There are some green glazes that go red or grey in soda, but are stunning with wood ash and lighter reduction.
I also like to test fire new forms and clay construction methods in low fire oxidation before I fire them in the soda kiln."
Any recommendations for other artists firing in multiple types firing atmospheres?
"Always test more! It’s worth it to keep searching for what else the kiln has to offer, and it keeps you on your toes."
Where do you see your work going from here?
"More pots! More sculpture! I have been working on some handbuilt vessels lately, and it feels more exciting and attention grabbing than wheel thrown pots."
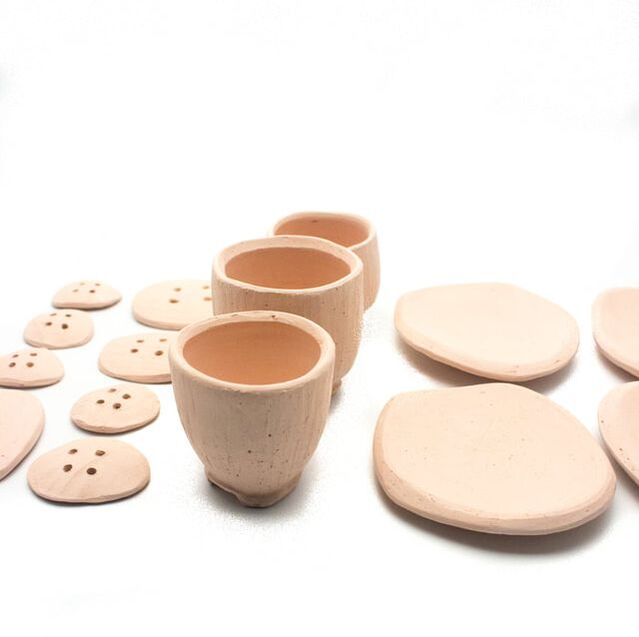
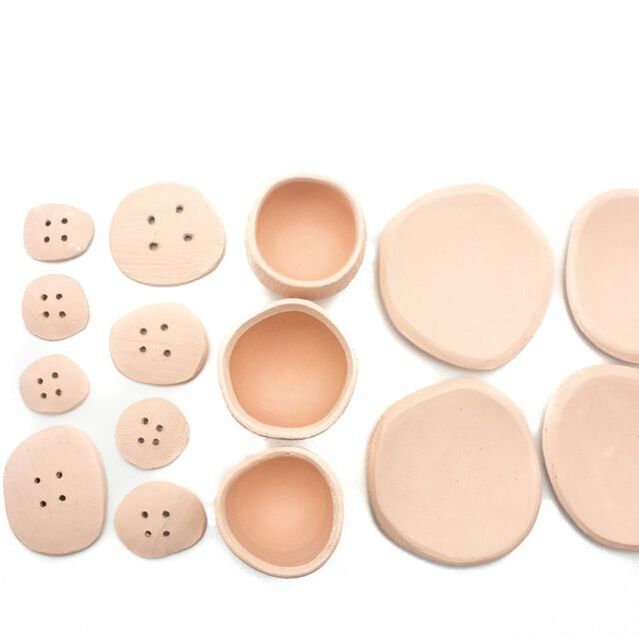
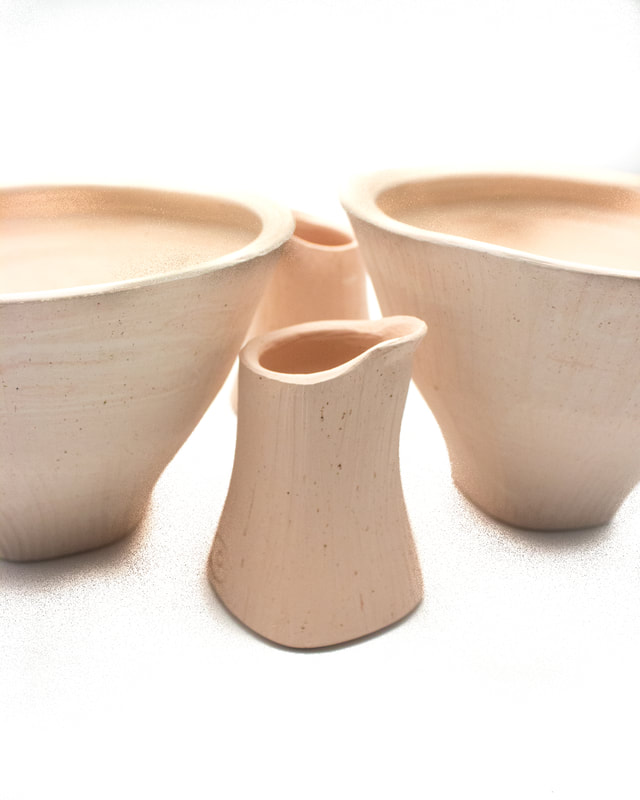
Top 4 kinds of kiln filler to bring to every soda or wood firing.
1. Tiny Objects
|
|
 |  |
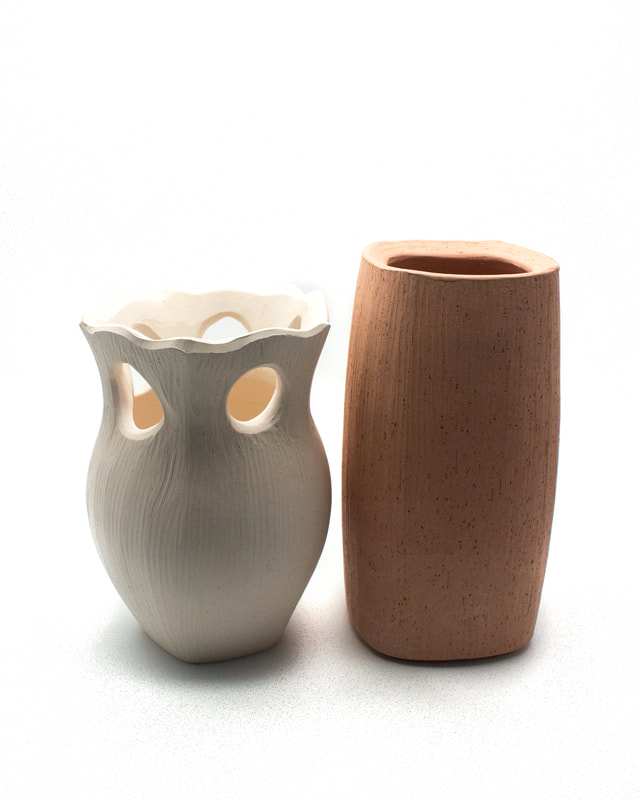
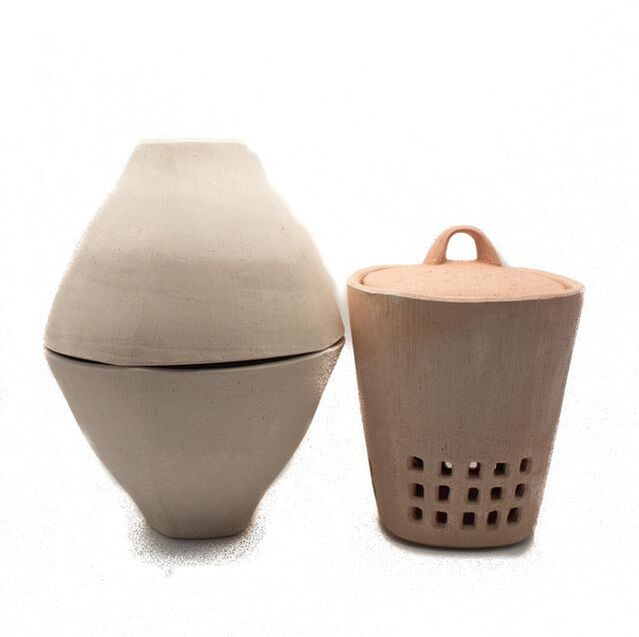
2. Tall and Thin Objects
|
|
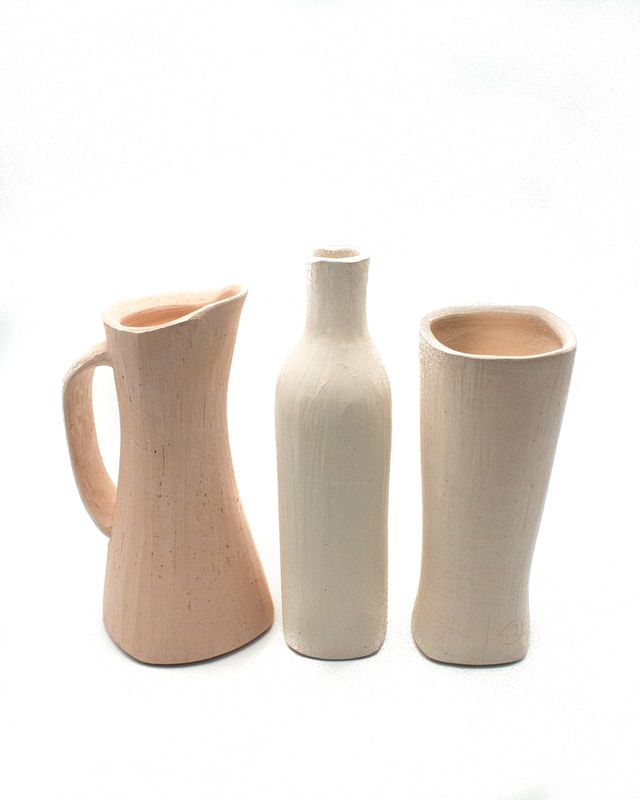 | 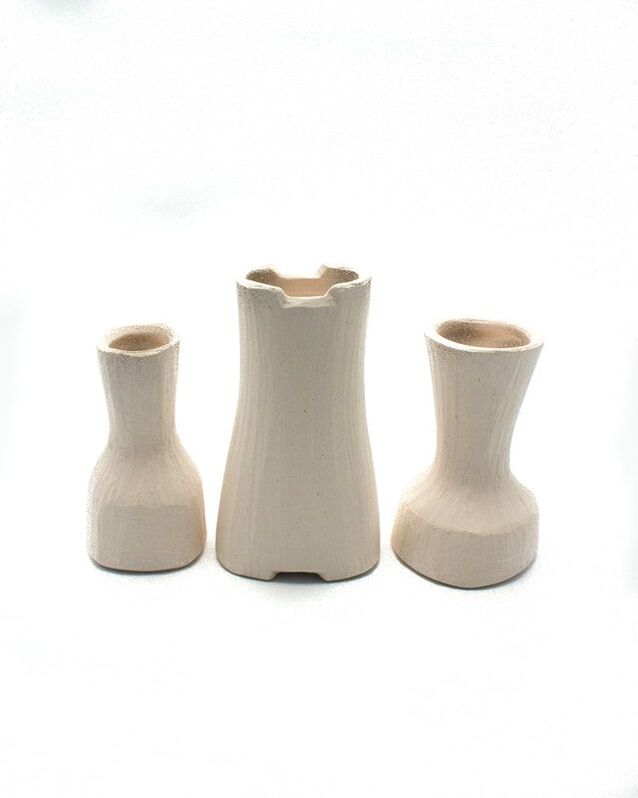 |
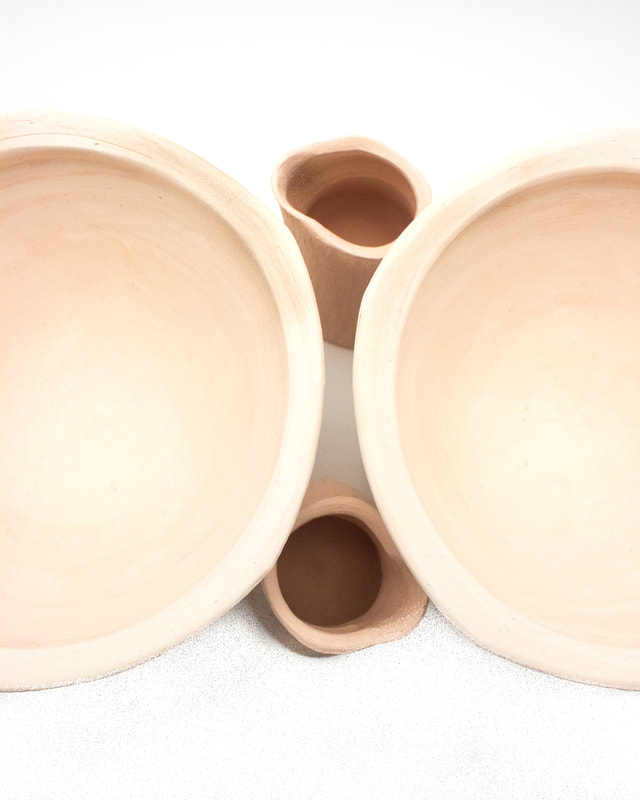
3. Pottery that mirrors each others shapes.
 |  |
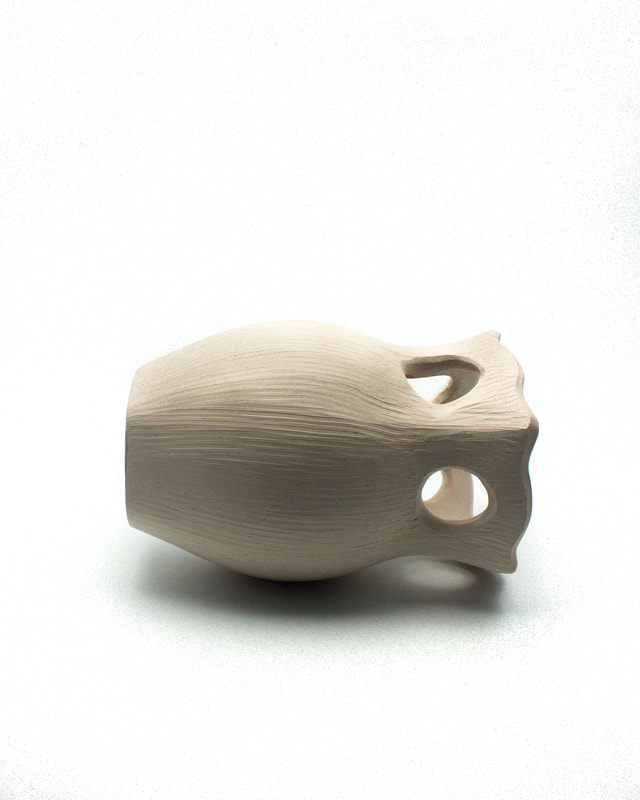
4. Specialty Kiln Fillers
Work to be fired on it's side.
 |  |
Non-open forms to go under the arch of a kiln.
(note: these bowls would be wadded rim to rim to be loaded into the kiln.)
Then click the button below to join.
Here on my blog I share behind the scenes, events, and activities related to my art.
 RSS Feed
Categories
All
Art Exhibition
Behind The Scenes
Coffee + Tea
Collect Art
Customer Reviews
Events
Flowers + Plants
Food
Home Decor
Inspiration
Mug Adventures
New Art Work
#PotsandMemories
Pots In Use
Press
Seasons + Holidays
Soda Firing
Travel + Art
+ Wood
Wood Firing
Workshops
Archives
February 2024
January 2024
December 2023
April 2023
February 2023
January 2023
December 2022
November 2022
October 2022
September 2022
August 2022
July 2022
June 2022
May 2022
April 2022
March 2022
February 2022
January 2022
December 2021
October 2021
September 2021
June 2021
May 2021
April 2021
March 2021
February 2021
January 2021
December 2020
November 2020
October 2020
September 2020
August 2020
May 2020
April 2020
March 2020
February 2020
January 2020
December 2019
November 2019
October 2019
September 2019
August 2019
July 2019
June 2019
May 2019
April 2019
February 2019
January 2019
October 2018
February 2018
September 2017
May 2017
March 2017
February 2017
January 2017
November 2016
March 2016
December 2015
November 2015